The clipping mask is one of the numerous tools you’ll find in Photoshop. It’s one of the most popular tools in Adobe Photoshop.
But the question is, what does a clipping mask do? We will discuss what it does in this post, how to use it, and more! Keep reading as we dive deeper.
What Does A Clipping Mask Do?
The clipping mask is a valuable tool in Adobe Photoshop. They help you link two layers together. Here’s an example of what the clipping mask does.
One way to use masking is to create a text or shape and link a photo to fit within the text or shape’s perimeter.
Another thing you can use the clipping mask for is selective adjustments to a single layer of documents.
A Handy Tip: The clipping mask and layer mask are different. Layer mask utilizes white and black colors to hide and display other parts of the layer.
What Is A Clipping Mask?
Clipping mask is one of the features of Adobe Photoshop. It connects multiple layers, helping to produce a shared mask based on the bottom most layer’s shape.
The bottom layer defines where the clipped layers will be visible and is centered on the layer mask or shape of the layer. These masks are helpful when applying adjustments on specific layer or altering an image’s shape.
Understanding How To Deploy Clipping Mask
Clipping mask is one of the popular features in Adobe Photoshop. I enjoy working with this tool.
You can hide parts of objects using a clipping mask. You can also use it to make only the area you require to be visible.
First, let’s review the clipping mask’s shortcut key in Adobe Photoshop. What are the shortcut keys?
You can create a clipping mask shortcut via the following keys:
Command + Option + G (for macOS) or Control + Alt + G (for Windows)
If you find the above shortcut overwhelming, you can try the alternative below:
Hold down Option (macOS) or Alt (Windows), then hover the mouse between the layers panel between the two top layers. When you see a downward arrow, click to apply the mask.
How To Create Clipping Mask Using Adobe Photoshop
The clipping mask utilizes the below layer’s content and transparency to control the above layer’s visibility. Here’s an example of how to create a clipping mask.
Step#1: Pick the layer you want to clip:
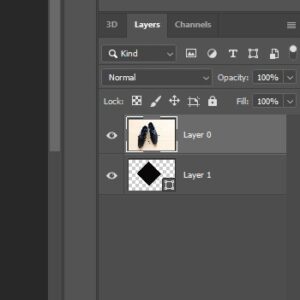
The first step is choosing the layer that you want to clip to the layer beneath. In this case, we’ll be clipping the top layer labeled (“Layer 0”) to the one labeled (“Layer 1”) to the bottom layer.
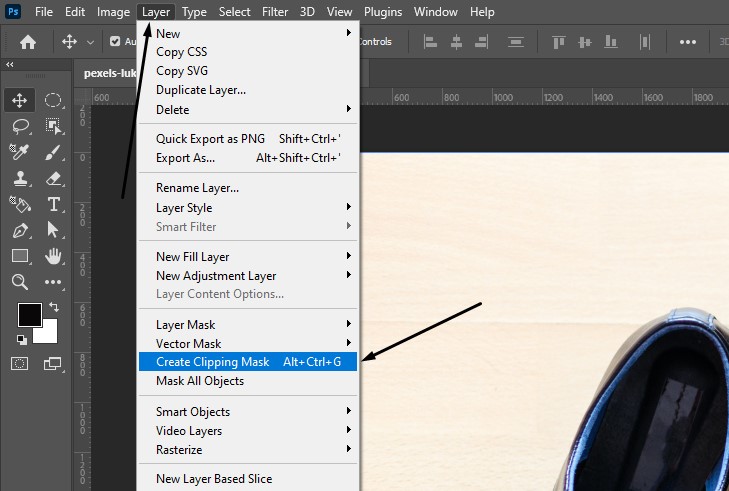
Step#2: Select the option “Create Clipping Mask”
You’ll locate this option in the layer menu. So, go to the layer menu and choose “Create Clipping Mask” to kick-start the process.
Layer Menu > Create Clipping Mask
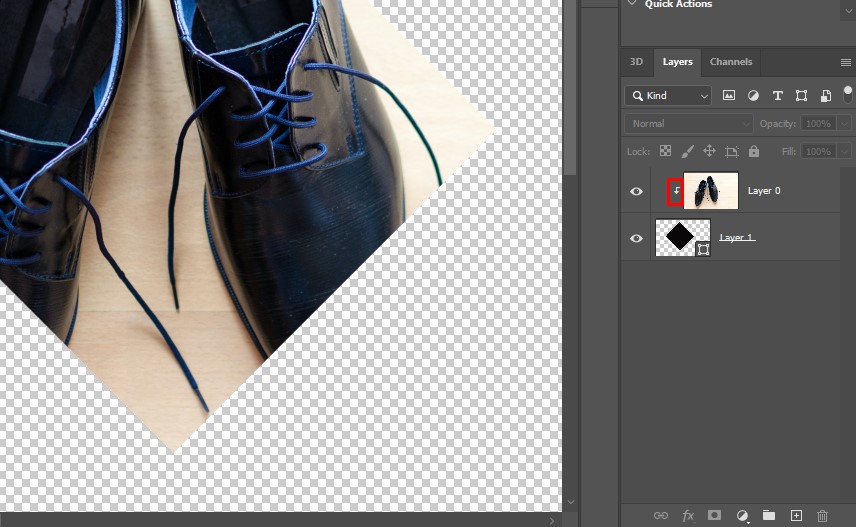
By clicking “Create Clipping Mask,” the image above is the result you’ll get.
This image tells you that you have successfully created the layer mask. You can see that the Layer panel is displaying (“Layer 0”), which is the top layer. It’s also moved to the right.
Look at the Layer panel. You’ll discover a small arrow on the left-hand side of (“Layer 0”). The arrow points to the down layer (“Layer 1”) and means something.
The small arrow means the top layer (“Layer O”) has been clipped to the bottom layer (“Layer 1”).
A Handy Tip: The basic thing we have done in the Layer panel by the clipping mask creation is that we have hidden the image from view. Why? The simple reason is that (“Layer 1”), which happens to be the mask layer, doesn’t have content. You can see clearly that it is transparent.
Another thing I would like you to know about clipping masks is this. Any layer (speaking of the top layer) sitting directly above the bottom layer’s transparent areas is hidden.
Since there is nothing in the bottom layer but transparency, no specific area of the above image is transparent.
Photoshop Clipping Mask Frequently Asked Questions
1: Why am I having a problem creating a clipping mask?
If you can’t create a clipping mask, here is the possible issue. The layer is more than one. That is, the underlying and overlying objects). Both objects have to be visible.
There must be filled-in pixels in the underlying layer, in which case you want the top layer to be visible.
2: How does the clipping mask operate?
With the clipping mask, you can only apply pixels from a photo on areas where pixels exist in an underlying layer.
Here is a clear example of what I meant. You can draw a circle in a layer and have it filled with color to make it solid. Then, you can insert a photo over the top in another layer and apply the clipping mask to ensure the picture only shows within that circle.
3: What are the basic uses of clipping masks?
Clipping mask is one of the features of Adobe Photoshop, popularly used in graphic design. Designers use it when creating layouts or for composites creation in photography.
Here is an example. Using a clipping mask, you can insert a photo in a frame or overlay a texture onto a bunch of text.
4: What shortcut key does the clipping mask have in Adobe?
Command + Option + G (for macOS) or Control + Alt + G (for Windows)
Here is the alternative below:
Firstly, hold down Option (macOS) or Alt (Windows), then hover the mouse between the layers panel between the two top layers. When you see a downward arrow, click to apply the mask.
5: Why is the clipping mask transparent?
The layer mask utilizes white and black to display and hide various areas of the layer. However, a clipping mask utilizes the transparency and content of one layer to control another’s visibility.
You require two layers to create a clipping mask, one layer at the bottom and another at the top. The one at the bottom controls the top layer’s visibility
6: What’s the meaning of white in a layer mash imply?
It means the mask is transparent and must be filled with black.
Conclusion
What does a clipping mask do? This popular feature in Adobe Photoshop enables you to link two layers together. In other words, when you create a text or shape and decide to link to a photo to fit within the text or shape’s perimeter.
You can also deploy a clipping mask for selective adjustments to a single layer of documents. However, the clipping mask is technical. Thus, you need a graphic designer’s help to get the design right.
Adobe Photoshop has an intuitive interface and plenty of features. A good graphic designer should be able to utilize these features to create outstanding designs.